Links I Love - 10.09.2015

links I love
links I love
 
  1. It's Friday.  Take a break and watch a few of these.  This guy will crack you up.  He works at BuzzFeed, and films these video where he drinks wine at work (and may or may not become inebriated) and comments on life.  HIL-AR-I-OUS!  (whineaboutit.tumblr.com)
  2. Pictures can say certain things better than any words can sometimes.  Here are some beautiful/inspiring/heartbreaking images to make you thankful/happy.humbled. (weblasters.com)
  3. Anything that can simplify life is a good thing in my book. Some of these beauty hacks are so simple I wonder why I didn't think of them on my own.  (cosmopolitan.com)
  4. Who doesn't love mac'n'cheese? Isn't it like the unofficial king of comfort food?  Not that it takes super long on the stove top, but here's a quicker microwave version from scratch. (theviewfromgreatisland.com)
  5. It really is fascinating to me how differently men and women see the same thing.  Sometimes I am so confused about what my husband thinks is attractive clothing on me.  Apparently I'm not alone. (cosmopolitan.com)
  6. Holiday time is fast approaching (can you believe it?!!)  Time to start thinking about holiday gifts.  I think these DIYs are super pretty and also look like they take more skill than they actually do.  These make impressive, attractive and useful gifts.
  7. Netflix is really killing it with quality original programming lately.  But in case you forgot, they also have movies from the big screen.  When you're done with your latest binge series, here's a list of the best films on Netflix. (agoodmovietowatch.com)
  8. Isn't the color of this glass soap dish so gorgeous? It reminds me of my wedding invitations, actually.  Maybe that's why I'm partial....  (houzz.com)  
  9. There have been studies that show that coloring is actually a good thing for adults to do, to books mental energy and creativity.  I'd forgotten that its actually fun until I started it at home with my toddler.  Here's some free printable sheets that are better than Mickey Mouse and Goofy.  (thecountrychiccottage.net)
 

Friday Favorites - Links I Love

Wishing you a wonderful weekend. Hope you find some of these as enjoyable/interesting as I did. 

links I love
  1. This DIY is amazingly easy (and inexpensive) but has such a rich result. I'm on the lookout for the right vase....(abeautifulmess.com)
  2. I find it hard enough to raise a toddler in an apartment, I can't imaging raising THREE on a boat. But an amazing way to experience the world (hopefully they're remember some of it.) Oh, and I want to know what these parent's job(s) are. (theplaidzebra.com)
  3. Style lessons from the queen of style we all wish we had, Carrie Bradshaw. (popsugar.com)
  4. It's a great time, professionally and nationally, to be Laverne Cox. (yahoo.com)
  5. Home-state pride, in this delicate and versatile jewelry piece.  They have all 50 states, so you could wear your history around your neck. (joyus.com)
  6. Every time I look there's a new genius app out there, making life a bit easier (or harder, depending on how you look at it, lol.)  Keep up to speed with this great list of time saving apps for your organization, wellness, travel, shopping, and entertainment. (goop.com)
  7. People get creative with the most mundane things.  This is for those of you who LOVE your coffee so much, you want kiss it. (behance.net)
  8. A gallery of some of the most beautiful photographs, aka eye candy.  (smugmug.com)
  9. Parenting is one of the hardest undertakings with no formal training involved.  This should be required material for all new parents. (huffpost.com)

Have to Try: Home Brewed Iced Coffee

I know many of you can't imagine starting your day without a hot cup of coffee.  I get it, but I'm not one of those people.  I'm not a morning person, by any means, but I've just never lived with a coffee maker and developed the habit.  That is not to be interpreted as I am not a coffee drinker.  I just don't have the means for it at home. So I usually get it from a shop or at work.  Plus, now that I have a toddler to chase around in the mornings while trying to get us out of the house, having a hot drink on hand is not ideal.


But I do love iced coffee.  I usually prefer a cold drink by the time I can actually sit and have a drink (after the toddler-wrangling), and it's a bit easier to transport in a spill-proof container.  I have learned the steps to properly home-brew my own cold coffee, and is the easiest thing ever.  I shake my head at myself for ever forking over the $4 per beverage to Starbucks. You don't need any fancy equipment, just a pitcher and strainer/filter.

The Thing To Know: Iced coffee is not simply hot brewed coffee over ice. I mean, you can do that, but its not the method to get the best tasting result.  Hot-brewing raises the acidity level which brings out the highs and lows of the flavor, but doesn't translate over well once cooled and diluted with ice.  Cold-brewing has a lower acid level, so you have a smoother-tasting coffee.

This takes a few minutes to prepare, but needs to steep for half a day.  But you can make a batch on the weekend that will make enough to get you through the week, because it will keep.

What you need:

  • A pitcher
  • a spare container, bowl or pitcher
  • A coffee filter & fine mesh strainer
  • 4 1/2 oz coarsely ground coffee
  • 3 1/2 cup cold water
  • Extras: milk/creamer, sweetener, ice

What to do:

  1. Place the coffee grounds in pitcher, add the water, stir to combine, cover with plastic wrap and let steep at room temperature for at least 12 hours and up to one day.
  2. Line the fine-mesh strainer with the coffee filter and fit it over the spare bowl/pitcher.  In batches, slowly pour the coffee into the filter until all of the liquid has passed through the strainer.  Discard the grounds & filter.
  3. If your coffee is now in a bowl, transfer back into the original pitcher AFTER you wash it clean.  If you used a spare pitcher, you can leave it there.  Cover pitcher and refrigerate until completely chilled, at least 2 hours or up to 5 days.

How to Serve:

  • The coffee you have made is very concentrated.  For each cup of iced coffee, dilute the concentrate with milk or water to your liking, and doctor as you like.
  • Pour over ice.
  • To get a coffee shop take on it, sweeten with simple syrup (recipe here.)
  • Enjoy!


Hello Friday - Links I Love

Wishing you all a wonderful weekend ahead.  Here are some fun things I came across on the web this week.


  1. I will probably have to invest in all three of these products.  We all know how important it is to use sunscreen daily, which it think (hope) most of us do first thing with our daily face application.  But the proper use of sunscreen requires reapplication during the day. Who does that once their makeup is on?  These products help solve that problem.
  2. Even if you don't have kids, if you've ever been around them, you can sympathize and join in the laughter found on this Instagram account: average parent problems.
  3. I am excited to look now for cheap, cute little dishes (99 cent store maybe?) and get some rope and beads and make these darling hanging planters.  Hanging planters are a perfect way to add more greenery to your home while keeping it baby-safe.  These look so easy!
  4. Just a little interesting fact explaining the purpose of the extra lace hole in your gym shoes. Huh, who knew?

15 Minute Vanity Stool Make- over

We all like to have nice things. But there is an extra sense of satisfaction you get when you have something nice that you put labor into. It doesn't even take a lot of work to transform something from blah to ahhh.

I recently rearranged furniture in my living room and bedroom to make more room in the former and add a vanity to the later.  While I already had the shelf/desk that I used for the vanity (moved from the living room), I didn't have proper seating for it in the bedroom (the chair for it when it was a desk remained in the living room.)  So I was using this small wooden stool I had from my college years when I was taking painting classes.  It was fine in terms of height, but I wanted a something a little more attractive and feminine for the space.  But I didn't want to spend a lot of $$, so I'd been keeping my eye out for something to replace it.

I don't usually do this (but I think it's because I don't usually stumble upon anything worth it) but this weekend when out walking our dog with my son, we came across some unwanted items some neighbors had left out on the street curb.  Including a vanity stool.  In perfectly fine condition, just ugly.  So I snagged it.  Took it upstairs and gave it a quick face lift, and I'm very happy with the results.

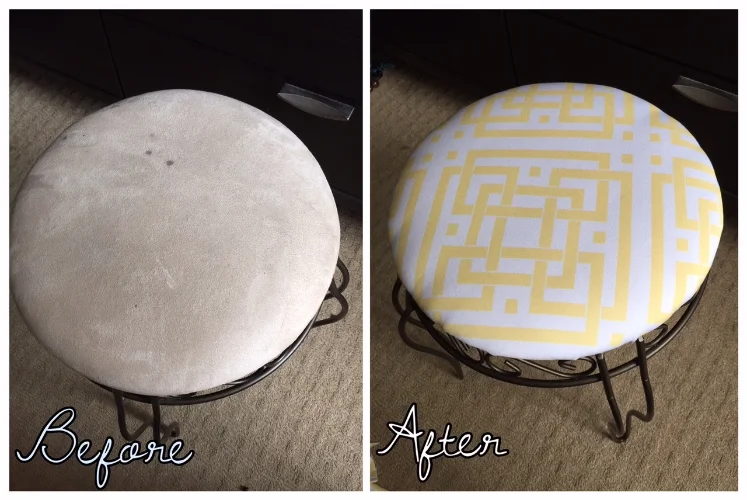
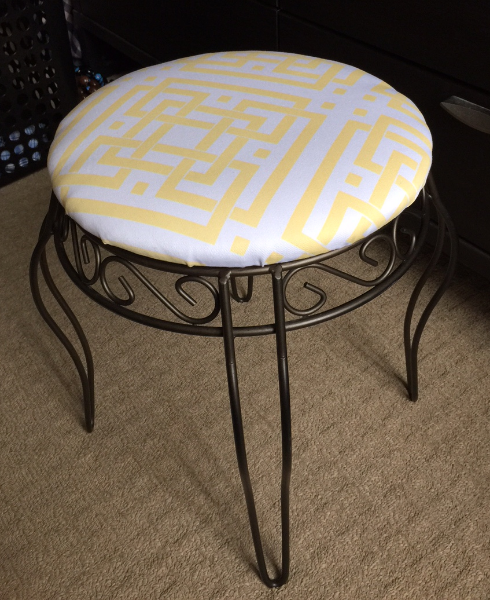
Changing the fabric on a cushion is one of the easiest ways to transform and customize a furniture item.   All you need is:

  • enough fabric of choice to cover the entire surface with at least 3 inches excess all the way around (more if your cushion is deep/thick)
  • a staple gun
  • a screwdriver (to remove the cushion from the base/legs)
  • scissors
  • possibly some batting (see 4 below)

** A quick note on the fabric:  fabric bought by the yard can get expensive.  Sometimes it helps to get creative with your sources.  The fabric I used here is actually a shower curtain (not the plastic coated kind, the outer décor curtain).  Found it at Marshalls for like $8, which gave me several square yards of fabric.  I had previously re-covered my dining room chair cushions with this fabric, and had left-overs.  It's great because its relatively heavy duty but still soft.  I'm thinking of using the rest to make some outdoor pillow covers. **

Back to the recovering  (it looks like a lot of steps, but it's really simple. I'm just spelling it out very basic here):

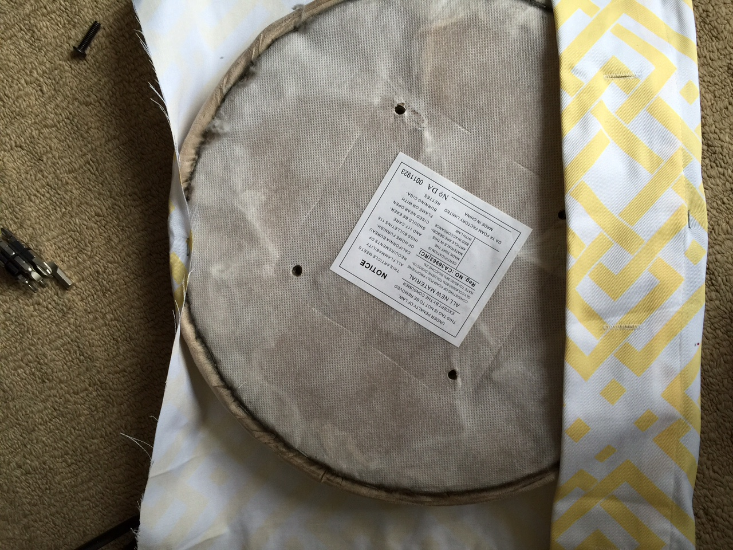
1.   Flip the stool over and remove the screws (or whatever is holding the seat to the base).

2.  Spread your fabric out flat and lay the now-removed seat on it, 3-4 inches from any fabric edge,  then cut out the piece you need, leaving 3-4 inches of fabric all the way around.  **Your cutting does not have to be neat or perfect.  Nor does it have to be the same shape as your seat (my seat is round and I cut a square, but just because of the shape of the fabric I had left over.)

3.  Iron your fabric if it needs it.  Mine had creases in it from being folded, I didn't want them evident once it was on the stool.

4.  (Not applicable in all situations.) If you're recovering a surface that has very dark fabric with light fabric, you may either need to remove the old layer or put a layer of batting between the old surface and the new.  I didn't need to do this as my old layer was a light color, and my new fabric was thick enough not to show through.

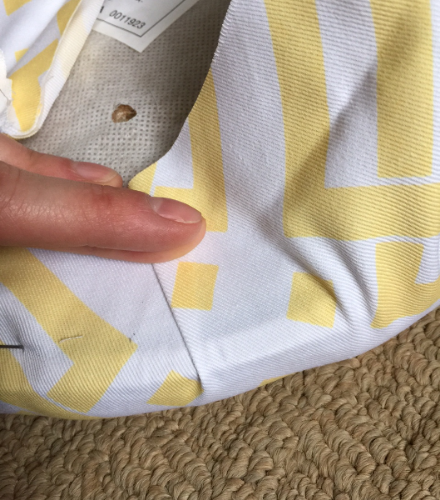
5.  Again, lay your fabric out, print side down, and put the stool top down, top down, and eyeball it center in your fabric.

6.  Pick and edge and staple.

Note in this photo I have a lot of extra fabric on one side and barely any on the other.  Yours should NOT look like this.  I was working with the top edge of the shower curtain that had holes for the curtain rings, and I wanted to be able…

Note in this photo I have a lot of extra fabric on one side and barely any on the other.  Yours should NOT look like this.  I was working with the top edge of the shower curtain that had holes for the curtain rings, and I wanted to be able to cut that all off at the end, so its uneven in this photo.

7.  For a round seat, like mine here, you're going to want to work back and forth, like taking the lug nuts off a tire (you know how to change your own car tire, right?  Come on, ladies, this is 2015.)  Pull snug, and staple directly across from the first staple.  (12 o'clock and 6 o'clock.)

8.  You want to get the first four "sides" stapled, so move to one of the unstapled sides and staple, then again go to the opposite side, pull taught, and staple.  (3 o'clock and 9 o'clock).

9.   Repeat this back and forth one more time, starting half-way between 12 and 3, then to half-way between 6 and 9, you get it....pull taught before each staple.

10.  From there you can start working your way around, a staple every inch to 2-inches.  You'll have to sort of fold the fabric to help it lay around the circle shape (see below.)  **Note: if you put a staple in and the fabric isn't laying right, you can ply the staple out with a flat screwdriver and/or needle-nose pliers and re-do.

11.  Once you get all the way around and your satisfied, you can trim the excess off.  Don't trim too close to the staples, leave about an inch of fabric.

12.  Put the base back on, flip it over, and viola!

IMG_6955.JPG