Friday Favorites - Links I Love

Wishing you a wonderful weekend. Hope you find some of these as enjoyable/interesting as I did. 

links I love
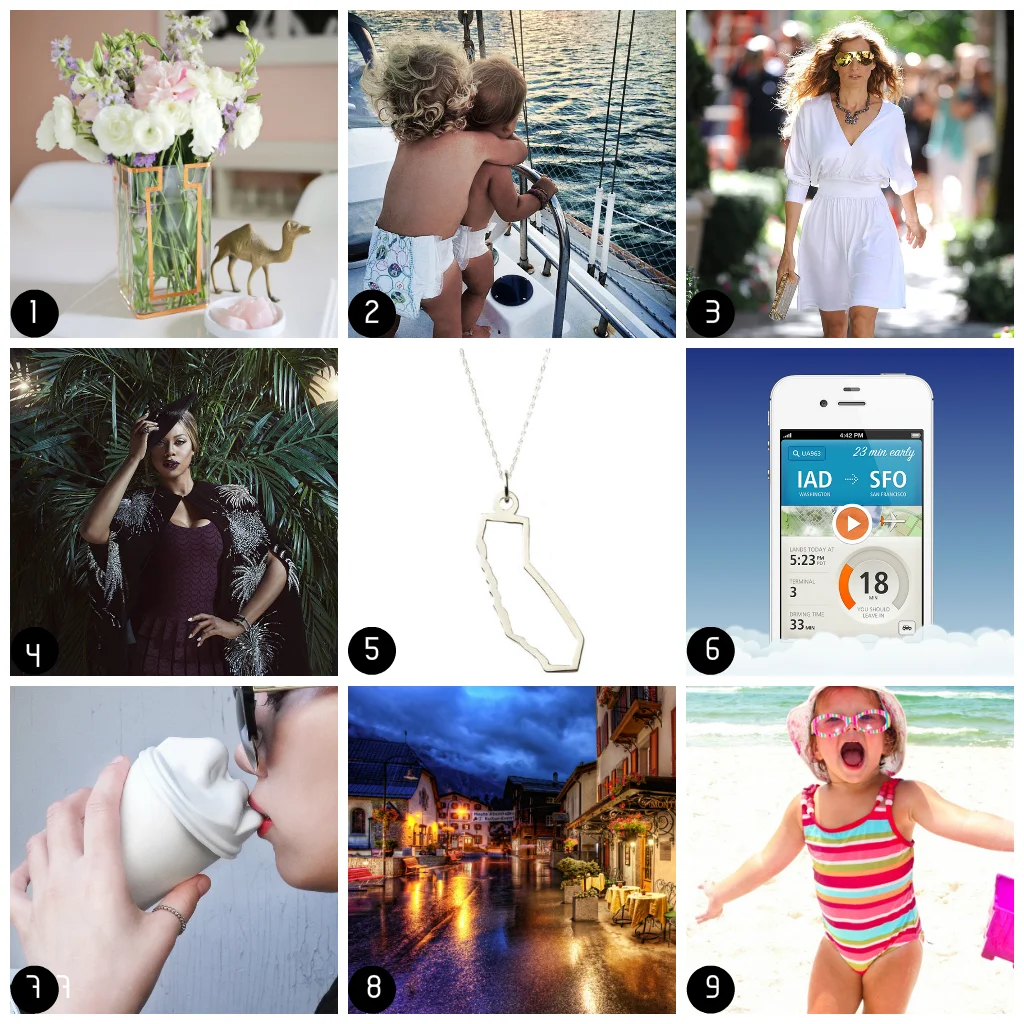
  1. This DIY is amazingly easy (and inexpensive) but has such a rich result. I'm on the lookout for the right vase....(abeautifulmess.com)
  2. I find it hard enough to raise a toddler in an apartment, I can't imaging raising THREE on a boat. But an amazing way to experience the world (hopefully they're remember some of it.) Oh, and I want to know what these parent's job(s) are. (theplaidzebra.com)
  3. Style lessons from the queen of style we all wish we had, Carrie Bradshaw. (popsugar.com)
  4. It's a great time, professionally and nationally, to be Laverne Cox. (yahoo.com)
  5. Home-state pride, in this delicate and versatile jewelry piece.  They have all 50 states, so you could wear your history around your neck. (joyus.com)
  6. Every time I look there's a new genius app out there, making life a bit easier (or harder, depending on how you look at it, lol.)  Keep up to speed with this great list of time saving apps for your organization, wellness, travel, shopping, and entertainment. (goop.com)
  7. People get creative with the most mundane things.  This is for those of you who LOVE your coffee so much, you want kiss it. (behance.net)
  8. A gallery of some of the most beautiful photographs, aka eye candy.  (smugmug.com)
  9. Parenting is one of the hardest undertakings with no formal training involved.  This should be required material for all new parents. (huffpost.com)

Hello Friday - Links I Love

Wishing you all a wonderful weekend ahead.  Here are some fun things I came across on the web this week.


  1. I will probably have to invest in all three of these products.  We all know how important it is to use sunscreen daily, which it think (hope) most of us do first thing with our daily face application.  But the proper use of sunscreen requires reapplication during the day. Who does that once their makeup is on?  These products help solve that problem.
  2. Even if you don't have kids, if you've ever been around them, you can sympathize and join in the laughter found on this Instagram account: average parent problems.
  3. I am excited to look now for cheap, cute little dishes (99 cent store maybe?) and get some rope and beads and make these darling hanging planters.  Hanging planters are a perfect way to add more greenery to your home while keeping it baby-safe.  These look so easy!
  4. Just a little interesting fact explaining the purpose of the extra lace hole in your gym shoes. Huh, who knew?

Almost Last Minute Mother's Day Gift Ideas

If you are better than me (and you should be, I don't recommend my MO) and don't wait until the last minute, then you have your mom's Mother's Day gift already.  If you're like me, you have 6 days of shopping, and less if you're ordering something that requires shipping.  Amazon Prime is always my savior in these situations.

This will be my second year as a mom myself, and every day I see new ways in which I appreciate my own mom more and more.  My husband did a good job with the mother's day gifts last year: he had a custom night shirt made for me with a silly picture of our then 4 month old son printed on the front.  And his daycare made a card with his tiny hand prints, and snuck a picture of my two boys. Of course I will keep them all forever.

As a now recipient of Mother's Day gifts, I've complied a small list of the kinds of things that I would enjoy receiving (I always try to give stuff that I'd be equally happy receiving), to help with gift ideas.


  1.  You really can never go wrong with chocolate covered strawberries, as far as I'm concerned.  And while this company offers their berries year round, it's strawberry season, so they're bound to be especially good right now.
  2. For the mom that loves to cook, Flavor God seasonings are chemical and filler free, and low on sodium up very high on flavor.  One of my favorites is Chipotle, but this combo starter pack is a good deal with good flavors.
  3. We all need places to store our jewelry, and this one is pretty to look at and multi-functional.  With a dish for chains and bangles, and little holes around the perimeter for earrings, it is an efficient use of counterspace.  Plus, it's in one of my favorite colors.
  4. I love this idea (not just because it means more jewelry ;) ).  Add to mom's wedding set with a band laid with children's birthstones (if you have more than 2 kids, you'd need pretty long fingers for this one, so maybe best for a mom with a small brood.)
  5. For the DIY-er, and the mom that loves DIY gifts (and uses mugs), you can put any custom message on a mug.  Its not very hard, but this gal offers her trial and error to save you from such.
  6. Another adorable DIY, and succulents are such a good idea because they are cute, easy to care for, and living (versus a cut bouquet that will die in a week.)
  7. I'm a big fan of pretty robes, especially the light ones that you wear for cover and comfort, not specifically warmth (I live in SoCal. It doesn't get very cold.) And I'm all for up-cycled products, and this beauty is made from reclaimed saris.
  8. We all love a cute, versatile bag.  And this one, from Toms (you know the one-for-one shoe company?) gives back: with every purchase of one of these bags, TOMs will help provide a safe birth for a mother and baby in need.

Happy Mother's Day to all the mothers out there.

15 Minute Vanity Stool Make- over

We all like to have nice things. But there is an extra sense of satisfaction you get when you have something nice that you put labor into. It doesn't even take a lot of work to transform something from blah to ahhh.

I recently rearranged furniture in my living room and bedroom to make more room in the former and add a vanity to the later.  While I already had the shelf/desk that I used for the vanity (moved from the living room), I didn't have proper seating for it in the bedroom (the chair for it when it was a desk remained in the living room.)  So I was using this small wooden stool I had from my college years when I was taking painting classes.  It was fine in terms of height, but I wanted a something a little more attractive and feminine for the space.  But I didn't want to spend a lot of $$, so I'd been keeping my eye out for something to replace it.

I don't usually do this (but I think it's because I don't usually stumble upon anything worth it) but this weekend when out walking our dog with my son, we came across some unwanted items some neighbors had left out on the street curb.  Including a vanity stool.  In perfectly fine condition, just ugly.  So I snagged it.  Took it upstairs and gave it a quick face lift, and I'm very happy with the results.

Changing the fabric on a cushion is one of the easiest ways to transform and customize a furniture item.   All you need is:

  • enough fabric of choice to cover the entire surface with at least 3 inches excess all the way around (more if your cushion is deep/thick)
  • a staple gun
  • a screwdriver (to remove the cushion from the base/legs)
  • scissors
  • possibly some batting (see 4 below)

** A quick note on the fabric:  fabric bought by the yard can get expensive.  Sometimes it helps to get creative with your sources.  The fabric I used here is actually a shower curtain (not the plastic coated kind, the outer décor curtain).  Found it at Marshalls for like $8, which gave me several square yards of fabric.  I had previously re-covered my dining room chair cushions with this fabric, and had left-overs.  It's great because its relatively heavy duty but still soft.  I'm thinking of using the rest to make some outdoor pillow covers. **

Back to the recovering  (it looks like a lot of steps, but it's really simple. I'm just spelling it out very basic here):

1.   Flip the stool over and remove the screws (or whatever is holding the seat to the base).

2.  Spread your fabric out flat and lay the now-removed seat on it, 3-4 inches from any fabric edge,  then cut out the piece you need, leaving 3-4 inches of fabric all the way around.  **Your cutting does not have to be neat or perfect.  Nor does it have to be the same shape as your seat (my seat is round and I cut a square, but just because of the shape of the fabric I had left over.)

3.  Iron your fabric if it needs it.  Mine had creases in it from being folded, I didn't want them evident once it was on the stool.

4.  (Not applicable in all situations.) If you're recovering a surface that has very dark fabric with light fabric, you may either need to remove the old layer or put a layer of batting between the old surface and the new.  I didn't need to do this as my old layer was a light color, and my new fabric was thick enough not to show through.

5.  Again, lay your fabric out, print side down, and put the stool top down, top down, and eyeball it center in your fabric.

6.  Pick and edge and staple.

Note in this photo I have a lot of extra fabric on one side and barely any on the other.  Yours should NOT look like this.  I was working with the top edge of the shower curtain that had holes for the curtain rings, and I wanted to be able…

Note in this photo I have a lot of extra fabric on one side and barely any on the other.  Yours should NOT look like this.  I was working with the top edge of the shower curtain that had holes for the curtain rings, and I wanted to be able to cut that all off at the end, so its uneven in this photo.

7.  For a round seat, like mine here, you're going to want to work back and forth, like taking the lug nuts off a tire (you know how to change your own car tire, right?  Come on, ladies, this is 2015.)  Pull snug, and staple directly across from the first staple.  (12 o'clock and 6 o'clock.)

8.  You want to get the first four "sides" stapled, so move to one of the unstapled sides and staple, then again go to the opposite side, pull taught, and staple.  (3 o'clock and 9 o'clock).

9.   Repeat this back and forth one more time, starting half-way between 12 and 3, then to half-way between 6 and 9, you get it....pull taught before each staple.

10.  From there you can start working your way around, a staple every inch to 2-inches.  You'll have to sort of fold the fabric to help it lay around the circle shape (see below.)  **Note: if you put a staple in and the fabric isn't laying right, you can ply the staple out with a flat screwdriver and/or needle-nose pliers and re-do.

11.  Once you get all the way around and your satisfied, you can trim the excess off.  Don't trim too close to the staples, leave about an inch of fabric.

12.  Put the base back on, flip it over, and viola!

IMG_6955.JPG

Friday Favorites

Friday Favorites

Happy Friday.  It is supposed to be very hot here this weekend. The weather feels a bit bi-polar lately, cold and rainy one week, 90 degrees and sunny the next.  Doesn't make for easy closet organization.  We don't have air conditioning in our apartment, and while we live close enough to the coast that the temperatures don't usually reach the max predictions, it can still get uncomfortably warm, especially when you're chasing/carrying a toddler around. We'll be going to Orange County to visit my parents in their air conditioned house.
 

Read More