Friday Favorites - Links

Sharing some amazing/fun things I found on the web this week.  Happy Friday! 
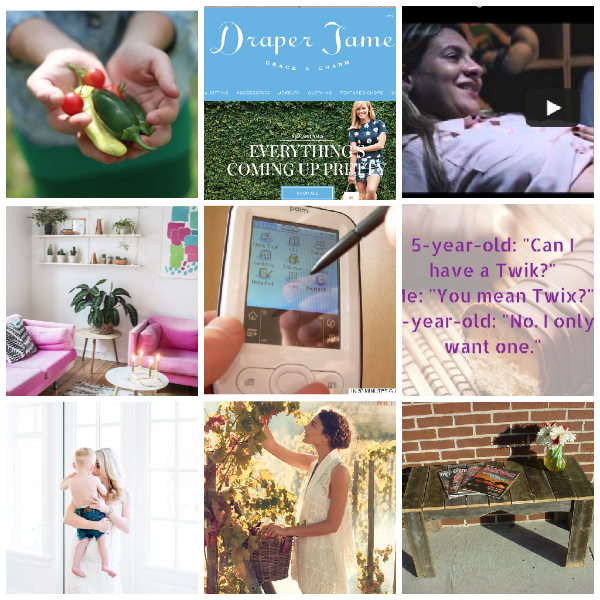
Top Row, L-R

Middle Row, L-R

  • Loving all the greenery and natural elements in this interior tour.  Inspired for my own home decor to use more plants. (abeautifulmess.com)
  • A trip down memory lane: a look back at our technology from 10 years (only 10 years) ago. Remember what you had? (huffpost.com)
  • You don't have to be a parent to appreciate that kids say the darndest things. (huffpost.com)

Bottom Row, L-R

What great things did you stumble across out there this past week?


15 Minute Vanity Stool Make- over

We all like to have nice things. But there is an extra sense of satisfaction you get when you have something nice that you put labor into. It doesn't even take a lot of work to transform something from blah to ahhh.

I recently rearranged furniture in my living room and bedroom to make more room in the former and add a vanity to the later.  While I already had the shelf/desk that I used for the vanity (moved from the living room), I didn't have proper seating for it in the bedroom (the chair for it when it was a desk remained in the living room.)  So I was using this small wooden stool I had from my college years when I was taking painting classes.  It was fine in terms of height, but I wanted a something a little more attractive and feminine for the space.  But I didn't want to spend a lot of $$, so I'd been keeping my eye out for something to replace it.

I don't usually do this (but I think it's because I don't usually stumble upon anything worth it) but this weekend when out walking our dog with my son, we came across some unwanted items some neighbors had left out on the street curb.  Including a vanity stool.  In perfectly fine condition, just ugly.  So I snagged it.  Took it upstairs and gave it a quick face lift, and I'm very happy with the results.

Changing the fabric on a cushion is one of the easiest ways to transform and customize a furniture item.   All you need is:

  • enough fabric of choice to cover the entire surface with at least 3 inches excess all the way around (more if your cushion is deep/thick)
  • a staple gun
  • a screwdriver (to remove the cushion from the base/legs)
  • scissors
  • possibly some batting (see 4 below)

** A quick note on the fabric:  fabric bought by the yard can get expensive.  Sometimes it helps to get creative with your sources.  The fabric I used here is actually a shower curtain (not the plastic coated kind, the outer décor curtain).  Found it at Marshalls for like $8, which gave me several square yards of fabric.  I had previously re-covered my dining room chair cushions with this fabric, and had left-overs.  It's great because its relatively heavy duty but still soft.  I'm thinking of using the rest to make some outdoor pillow covers. **

Back to the recovering  (it looks like a lot of steps, but it's really simple. I'm just spelling it out very basic here):

1.   Flip the stool over and remove the screws (or whatever is holding the seat to the base).

2.  Spread your fabric out flat and lay the now-removed seat on it, 3-4 inches from any fabric edge,  then cut out the piece you need, leaving 3-4 inches of fabric all the way around.  **Your cutting does not have to be neat or perfect.  Nor does it have to be the same shape as your seat (my seat is round and I cut a square, but just because of the shape of the fabric I had left over.)

3.  Iron your fabric if it needs it.  Mine had creases in it from being folded, I didn't want them evident once it was on the stool.

4.  (Not applicable in all situations.) If you're recovering a surface that has very dark fabric with light fabric, you may either need to remove the old layer or put a layer of batting between the old surface and the new.  I didn't need to do this as my old layer was a light color, and my new fabric was thick enough not to show through.

5.  Again, lay your fabric out, print side down, and put the stool top down, top down, and eyeball it center in your fabric.

6.  Pick and edge and staple.

Note in this photo I have a lot of extra fabric on one side and barely any on the other.  Yours should NOT look like this.  I was working with the top edge of the shower curtain that had holes for the curtain rings, and I wanted to be able…

Note in this photo I have a lot of extra fabric on one side and barely any on the other.  Yours should NOT look like this.  I was working with the top edge of the shower curtain that had holes for the curtain rings, and I wanted to be able to cut that all off at the end, so its uneven in this photo.

7.  For a round seat, like mine here, you're going to want to work back and forth, like taking the lug nuts off a tire (you know how to change your own car tire, right?  Come on, ladies, this is 2015.)  Pull snug, and staple directly across from the first staple.  (12 o'clock and 6 o'clock.)

8.  You want to get the first four "sides" stapled, so move to one of the unstapled sides and staple, then again go to the opposite side, pull taught, and staple.  (3 o'clock and 9 o'clock).

9.   Repeat this back and forth one more time, starting half-way between 12 and 3, then to half-way between 6 and 9, you get it....pull taught before each staple.

10.  From there you can start working your way around, a staple every inch to 2-inches.  You'll have to sort of fold the fabric to help it lay around the circle shape (see below.)  **Note: if you put a staple in and the fabric isn't laying right, you can ply the staple out with a flat screwdriver and/or needle-nose pliers and re-do.

11.  Once you get all the way around and your satisfied, you can trim the excess off.  Don't trim too close to the staples, leave about an inch of fabric.

12.  Put the base back on, flip it over, and viola!

IMG_6955.JPG

Friday Favorites - Check these out

ff.jpeg

Another TGIF has arrived.  For everyone headed to Coachella this weekend, have fun and be safe and stay hydrated (supposed to be in the 90s).  For the rest of us, have fun and be safe as well doing whatever fun your weekend holds.  And if you have a few minutes to browse the web, may I introduce you to a few blogs that I enjoy on a regular basis (I check them out pretty much every day as part of my Bloglovin' feed.)

blogfaves.jpg
  • Lace and Locks - by Kim Le.  This is a fun one for me to follow and share because Kim Le is a girl I know from high school.  She is now a super talented  wedding/engagement/boudoir photographer and an entrepreneur, with her own online boutique and this style blog for petite women.  I'm about a foot taller than her, so we're dressing for different body types, but I totally appreciate her sense of style and she has great taste.
  • J's Everyday Fashion - by "J".  This style blog is for most of us. Most of us have budgets, very practical, less than even 3-digit budgets.  Even with 20% off sales, most of us can't afford a $500 dress.  J takes high fashion/deisnger looks and styles her own version with affordable pieces, and she shows how she keeps to her budget and invests in versatile pieces.
  • Style by Emily Henderson - by Emily Henderson.  If you ever watch HGTV then you might recognize the adorable Emily Henderson.  She has a great home makeover show that I loved.  She has a fun personality and it comes through in her design.  Her blog is fun and inspires my home décor ideas.

And to wrap up the week, a flashback Friday image to make you smile from exactly one year ago: silly faces with mom and a bald Little Dude.

Links

  1. Growing Tulips in a Vase - spring flowers for those of us without a flower bed.
  2. Need help deciding how to decorate? Take the Ultimate Find-Your-Style quiz.
  3. Insight on how to deal with toddler tantrums and disciple without adding to the drama.
  4. 6 Easy Top Knots - because who doesn't need quick, easy up-do ideas?
  5. Are you a tea drinker? This little steeper man was just too cute not to share.
  6. Nailed it - there's a vast difference between 'old' millennials and 'new' millennials.
  7. In pursuit of reducing waste and repurposing - 101 Things to do with Mason Jars.
  8. Baked Apple Donuts - yes, please.
  9. Some cute ideas for the surplus of Easter eggs you have left over.